SafeCom — Print Solution at Department of Geosciences and UiO
[Shortcuts: Getting Started, Registering your card, Setting it up yourself, F.A.Q., pushprint]
Overwiew
Printing is done by sending the print job to a central queue, you pick up the prints at (almost) any printer with your employee or student card.
There is one queue for HP printers, and one for Ricoh, as they have different drivers. You can still collect your job at any printer.
The queues to use are set up automatically for department machines. They will appear with a name with "pullprint" something.
Here is a list of available printers. Note the column for SafeCom Pullprint, these are printers with a card reader.
Getting Started
Check your card

At your convenience, drop by a SafeCom-enabled printer. Suggestions are ig_ceed1 (1st floor CEED), igle (1st floor, Geo building), metosmfp (Metos).
- On some (older) Ricoh models, you might need to wake the printer from sleep (lift the lid), and push the "SafeCom" button on the printer (bottom left or on the LCD).
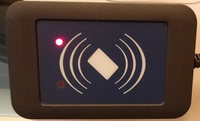
- Hold your employee or student card close to the card reader.
- Your name should appear on the screen.
Congratulations, your card has been recognized! - Log out by pushing the appropriate button (Ricoh), or swipe your card again (HP).
If you don't see your name, try to repeat the steps above a couple of times. Possible error situations:
- Somebody else is logged in, and forgot to log out. Just log them out.
- You get some other persons name. Please contact the IT-staff.
- You just get the message "unknown card/type PUK". Press Avbryt/Cancel/Back, and continue reading.
Registering your card manually
If your card is not recognized, you can register the card manually.
- Visit utskrift.uio.no and log in.
- Optionally, choose "Oppsett", then "Språk" and "English" (or the language of your choice).
- Then "Codes" and "Generate new PUK". Write down your PUK code, 8 digits.
Alternately, send a print job to pullprint, you should receive an email with a PUK code. (this will likely not work)- On the printer, use your card again. The "unknown card" message appears, followed by a prompt to type in the PUK. Do so!
- Type in the PIN code "1234" when prompted (twice, Ricoh only).
Your card should now be registered with SafeCom. You can confirm this by logging out and swiping your card again.
Discard the PUK code. You will not need it again.
- Submit your print job to one of the print queues mentioned above.
- Walk over to the closest printer (with a card reader).
- Hold your card up against the card reader.
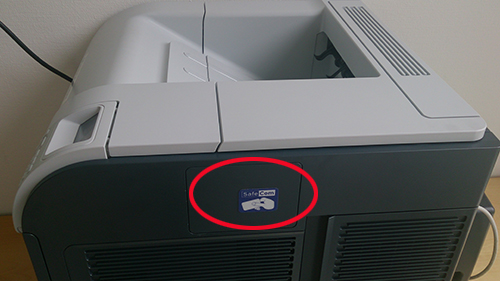
On HP printers, the card reader might be inside the casing. Look for the blue sticker. Your queued jobs will be printed automatically. - On Ricoh printers, select SafeCom, then "pullprint" followed by "print alle" to print all jobs, or select individual jobs for printing or deleting.
- Do remember to log out. This should happen automatically in half a minute or so, but doesn't always. On Ricoh, use the "logout" button on the LCD. On HP, just use your card again.
Printing from a mobile device
You can also print by logging in to mobilprint.uio.no and upload e.g. a PDF file. This is useful for mobile devices. Note that this doesn't work if you use a foreign ID for eduroam.
mobilprint has been shut down. It will eventually be replaced by Web Print, but this is not possible for printers still in the old SafeCom system.
Checking the print queue
Log in to utskrift.uio.no to see the jobs you have waiting in queue.
Scan
The Ricoh machines can scan documents and send you the PDF by email. With SafeCom your email address is found automatically.
- Log in to a Ricoh machine by swiping your card and pushing the SafeCom button.
- Select e-mail
- Adjust settings for your scan, as desired.
- Scan!
- Log out.
If you want to send the document to somebody else, do so from your ordinary email program.
Setting it up yourself
If your machine has not been set up automatically, you can do so yourself. This applies to e.g. private laptops. You have to be on a UiO network for this to work, cable or WiFi (otherwise, use mobilprint).
Linux/Mac, text terminal:
You can set up a simple "generic" queue, or a more complex queue that will enable colour, stapling, etc.
Start by downloading the PPD file (driver) of your choice:
- Generic PostScript
- Ricoh MP C4500 (PostScript)
- OpenPrinting, with lots of PPD's for various models.
As a single queue will be used for different printers, the driver you choose shouldn't be too specific. PostScript PPD's are usually recommended, as PostScript print jobs are at least likely to print on any PostScript printer (virtually all UiO printers are PostScript printers).
Issue the following command in a terminal, that's one long line. Use cut-and-paste, but don't hit Enter yet!
sudo lpadmin -p "SafeCom" -E -v lpd://MyUioUsername@pullprint.uio.no/ricoh -P ~/Downloads/postscript.ppd -D "SafeCom pullprint" -L "Anywhere" -o Resolution=600dpi -o PageSize=A4 -o Duplex=DuplexNoTumble -o printer-is-shared=false -o printer-error-policy=abort-job
Now, use the arrow keys and backspace, and substitute or check the following:
- Your UiO username for MyUioUsername
- The path and name of the PPD file you downloaded
You can also change the name and description of the queue, if you like. This is given by the -p and -D options in the above command.
Now, hit Enter. You will be asked to type your password for root access.
If your UiO username is identical to your username on the local machine, you can skip the "username@" part.
You can now find the printer in your system settings, and possibly tweak a few things, e.g. enable the Finisher SR3210 or something similar to enable stapling (if you used the Ricoh driver).
If things doesn't work as expected, remove the queue and try again. You can experiment with various PPD files — printer setup is not an exact science!
Note: On some systems, you will see a warning about PPD files being deprecated. You might want to skip the -P ppd-file option if this bothers you, and try setting printer make and model from the system settings.
Linux/Mac, graphical interface:
This is arguably simpler, but varies a bit between OS and distros. The terminal procedure above is recommended if you can't make this work.
Windows 10:
Click the magnifying glass bottom left, \\pullprint.uio.no\ricoh, hit Enter.
Frequently Asked Questions (FAQ)
- It doesn't work!
It might take a few minutes from you submit a print job until it is available. - I can print from my computer, and I can see my name on the printer display, but I can't find my print jobs (nothing gets printed)!
It is possible you have two accounts, and your card is registered to the "wrong" account. Get in touch! - I have forgotten my card!
You can still print at the Ricoh machines by logging in manually. Tap the screen and log in with your username and password. If that doesn't work, register another card (see below). - I don't have an employee card!
Actually, you can register any card with a compatible RFID chip. Ruter travel cards ("flexus") are known to work. See the procedure above.
You can also borrow a suitable card from the IT staff at Geofag. Please do not register UiO temporary admission cards (without your name and picture) for printing. - What happens if I don't collect the prints?
They will hang around on the server for a couple of days. Then they are gone. - It still doesn't work!
A few dos and don'ts:- If possible, make sure you are on the cabled UiO network.
- Don't print from the built-in (or plugin) PDF reader in your browser. Save the PDF to a file, open it in some special-purpose PDF software (acrobat, evince, preview, etc...). If one doesn't cut it, try another, possibly on a server.
- No colour? Look through all the options in the print dialogue, there are sometimes hard-to-find options for colour that are unchecked.
- Problems still? Drop by the IT office, or send us an email. We will try to sort it out.
Pushprint
A few printers cannot be equipped with card readers. These printers will be available in the pushprint system.
Your computer may already have been set up to use the "push" printer in question. If this is the case, you can just print as usual.
To set up your Windows computer for pushprint, open the Windows search panel and type \\pushprint\printername , where printername is the name of the printer. This should be on a sticker or note on the printer.
For more information, including how to set up other machines, visit this site (Norwegian only).
Printing from the command line (Linux)
If you use a UiO-configured Linux machine (RHEL/Fedora/Ubuntu), you can print from the command line, like in the good old days:
-
pullprint file
-
pushprint -Pprinter file
Here, printer is the name of the printer in the pushprint system (e.g. igloo). The file must be PostScript, Text, or PDF. For pullprint, you can also specify -Php or -Pricoh, but it shouldn't matter.
You'll need the RPM package uio-print-utils for this, let us know if it is not installed on your machine.
These print utilities are somewhat limited. They are not able to read print data from standard input (stdin), and UTF-8 text is only partly supported (text that maps to Latin-1 characters should be OK). They do not, however, require that the queues are set up on your local machine, and the pushprint command will prompt for password.
If the pullprint queue is set up locally (so it is known to CUPS), you can also print with lpr, eg:
-
lpr -Ppullprint_generic file
You can add whatever options CUPS will recognize, eg. "-o landscape".
Note that lpr doesn't know how to prompt for password, so you cannot use pushprint queues with lpr.
[ Short URL to this page: geo.uio.no/safecom ]
