
|
Detailed Instructions
for Your First Program
The following instructions will help you write your first Java program.
These instructions are for users of Win32 platforms, which include Windows
98, Windows 95, and Windows NT.
|
1.
A
Checklist

To write your first program, you will need:
-
The JavaTM 2 Platform, Standard Edition.
-
A text editor. In this example, we'll use NotePad, the simple editor
included with the Windows platforms. To find NotePad, from the Start
menu select Programs > Accessories
> NotePad. You can easily adapt these instructions
if you use a different text editor.
These two items are all you need to write your first Java program.
2.
Creating
Your First Application
|
|
| Why
Bytecodes are Cool
So, you've heard that with the Java programming language,
you can "write once, run anywhere." This means that when you compile your
program, you don't generate instructions for one specific platform. Instead,
you generate Java bytecodes, which are instructions for the Java Virtual
Machine (Java VM). If your platform--whether it's Windows, UNIX, MacOS,
or an Internet browser--has the Java VM, it can understand those bytecodes. |
|
|
Your first program, HelloWorldApp, will simply
display the greeting "Hello world!". To create this program, you will:
-
Create a Java source file. A source
file contains text, written in the Java programming language, that you
and other programmers can understand. You can use any text editor to create
and edit source files.
-
Compile the source file into a bytecode file.
The Java compiler,
javac, takes your source file and translates
its text into instructions that the Java Virtual Machine (Java VM)
can understand. The compiler puts these instructions into a bytecode file.
-
Run the program contained in the bytecode file. The Java VM is
implemented by a Java interpreter,
java. This
interpreter takes your bytecode file and carries out the instructions
by translating them into instructions that your computer can
understand.

|
 top top
a.
Create a Java Source File.
You have two options:
- You can save the file
HelloWorldApp.java
on your computer and avoid a lot of typing. Then, you can go straight
to step b.
- Or, you can follow these (longer) instructions:
1. Start NotePad. In a new document,
type in the following code:
/**
 * The HelloWorldApp class implements an application that
 * simply displays "Hello World!" to the standard output.
 */
class HelloWorldApp {
    public static void main(String[] args) {
        System.out.println("Hello World!"); //Display the string.
    }
}
|
| Be
Careful When You Type |
 |
 |
Type all code, commands, and file names exactly as shown.
The Java compiler and interpreter are case-sensitive, so you must
capitalize consistently.
HelloWorldApp
 helloworldapp helloworldapp
|
2. Save this code to a file. From the
menu bar, select File > Save
As. In the Save As dialog box:
-
Using the Save in drop-down menu, specify
the directory (folder) where you'll save your file. In this example, the
directory is
java on the C drive.
-
In the File name text box, type
"HelloWorldApp.java", including the double quote marks.
-
From the Save as type drop-down menu, choose
Text
Document.
When you're finished, the dialog box should look like this:
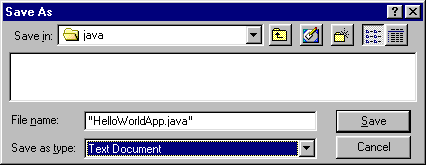 Now click Save, and exit NotePad.
top
b.
Compile
the Source File.
From the Start menu, select the
MS-DOS
Prompt application (Windows 95/98) or Command
Prompt application (Windows NT). When the application launches,
it should look like this:
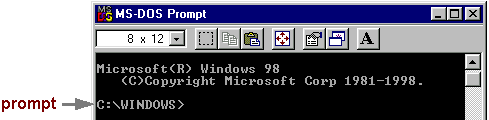
The prompt shows your current directory. When you bring up the prompt
for Windows 95/98, your current directory is usually WINDOWS on
your C drive (as shown above) or WINNT for Windows NT.
To compile your source code file, change your current directory to the
directory where your file is located. For example, if your source directory
is java on the C drive, you would type the following
command at the prompt and press Enter:
Now the prompt should change to C:\java>.
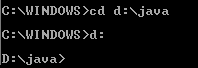
Note: To change to a directory on a different drive,
you must type an extra command.
|
As shown here, to change to the java directory
on the D drive, you must reenter the drive, d: |
If you enter dir at the prompt, you should see your file.

Now you can compile. At the prompt, type the following command and press
Enter:
If your prompt reappears without error messages, congratulations. You have
successfully compiled your program.
Error
Explanation
Bad command or file name (Windows 95/98)
The name specified is not recognized as an internal or external
command, operable program or batch file
(Windows NT)
If you receive this error, Windows cannot find the Java compiler, javac.
Here's one way to tell Windows where to find javac. Suppose
you installed the Java 2 Software Development Kit in C:\jdk1.2.2.
At the prompt you would type the following command and press Enter:
C:\jdk1.2.2\bin\javac HelloWorldApp.java
Note: If you choose this option, each time you compile or run a
program, you'll have to precede your javac and java commands
with C:\jdk1.2.2\bin\. |
The compiler has generated a Java bytecode file, HelloWorldApp.class.
At the prompt, type dir to see the new file that was generated:
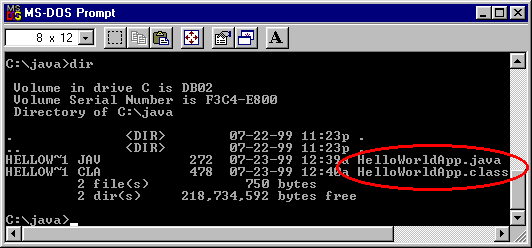 Now that you have a
 .class file, you can run your program.
top
c.
Run the Program.
In the same directory, enter at the prompt:
Now you should see:
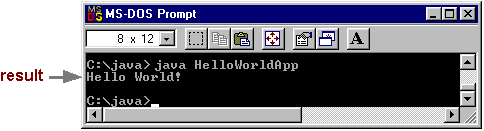 Congratulations! Your program works.
Error
Explanation
Exception in thread "main" java.lang.NoClassDefFoundError: HelloWorldApp
If you receive this error, java cannot find your bytecode file,
HelloWorldApp.class.
One of the places java tries to find your bytecode file is
your current directory. So, if your bytecode file is in C:\java,
you should change your current directory to that. To change your directory,
type the following command at the prompt and press Enter:
cd c:\java
The prompt should change to C:\java>. If you enter dir
at the prompt, you should see your .java and .class files.
Now enter java HelloWorldApp again.
If you still have problems, you might have to change your CLASSPATH
variable. To see if this is necessary, try "clobbering" the classpath with
the following command:
set CLASSPATH=
Now enter java HelloWorldApp again. If the program works now,
you'll have to change your CLASSPATH variable. |
top
|